Streamline Your Blogging Workflow Using Jenkins for Continuous Integration and Deployment
Ever wondered how to effortlessly publish your blog posts without the manual hassle? Imagine a system that automatically builds, tests, and deploys your content – every single time you make a change. This is the power of CI/CD, and in this blog post, we'll reveal how to harness it using Jenkins, a powerful open-source tool.
Understanding CI/CD and its Benefits :-
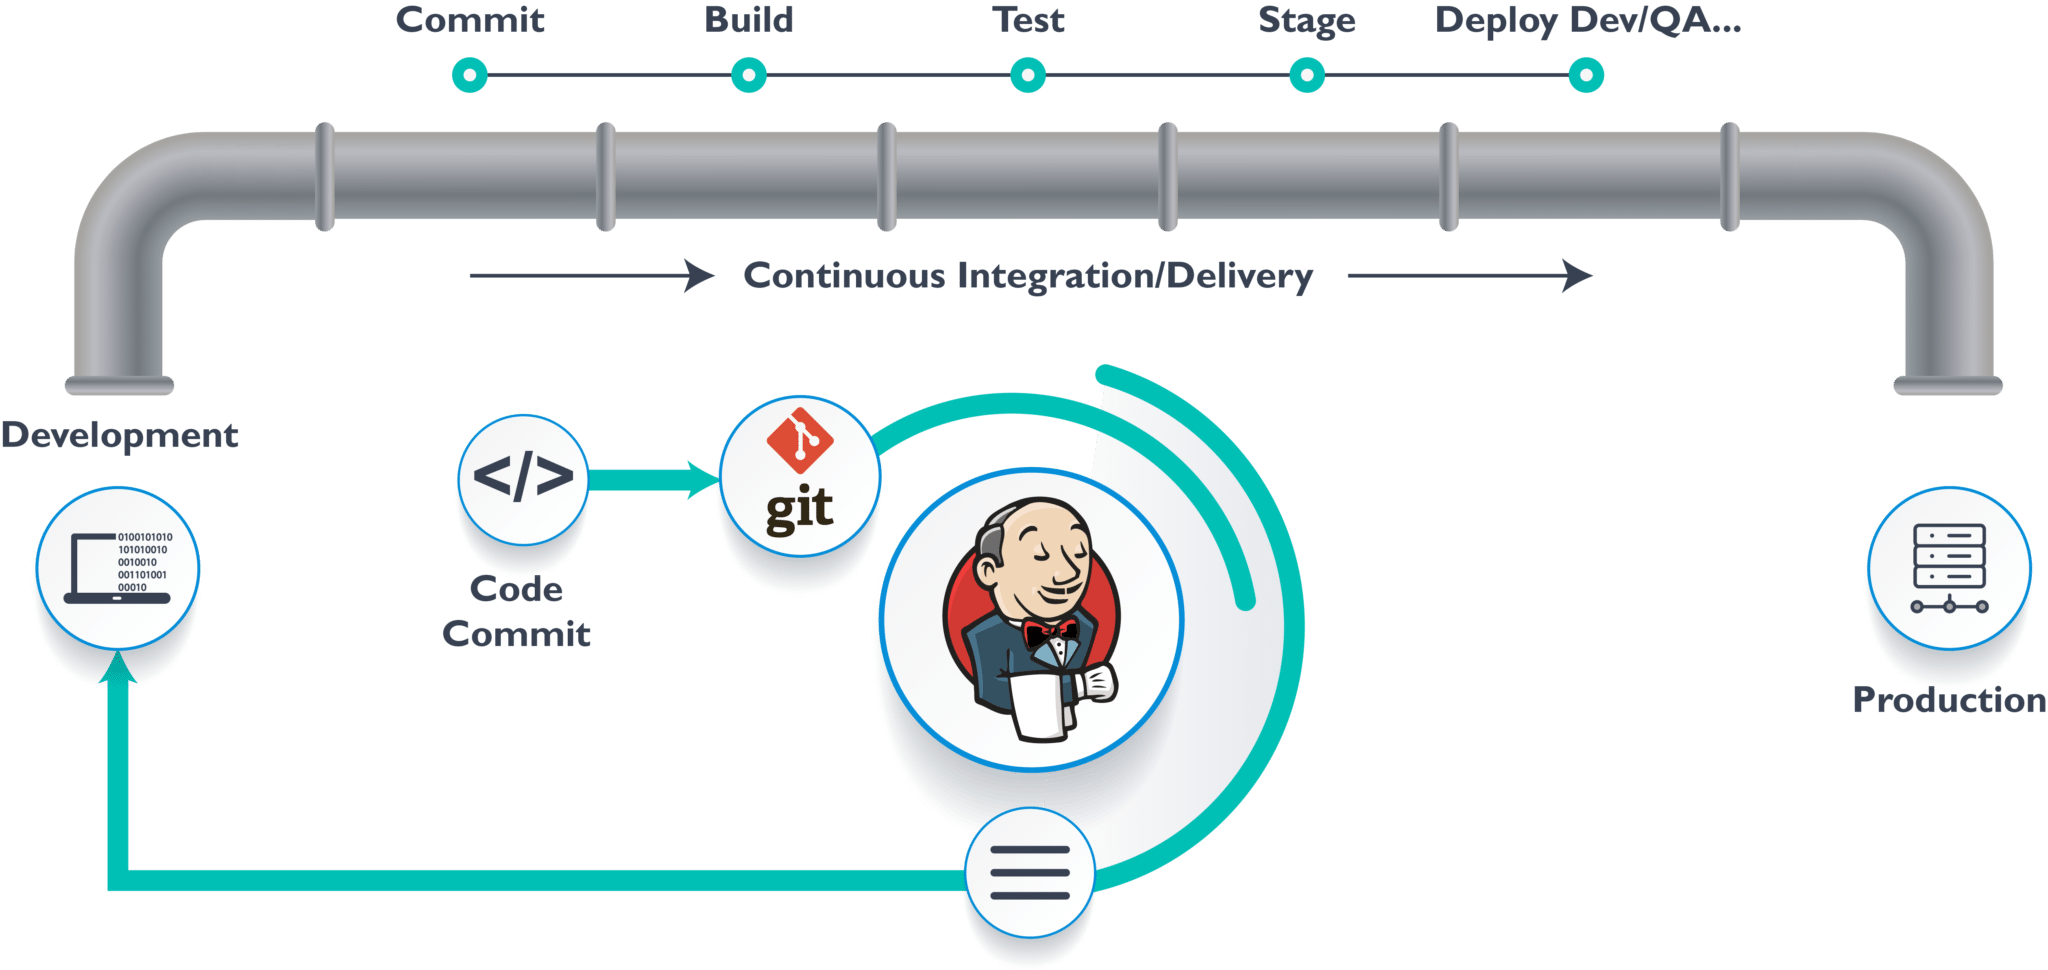
- CI/CD, or Continuous Integration/Continuous Delivery/Continuous Deployment, is a set of practices that automates the process of software development. In the context of blogging, this means automating the steps from writing a post to publishing it live on your website. The benefits are numerous: reduced manual effort, faster publication times, fewer errors, and improved consistency. Think of it as your blog’s personal assistant, tirelessly working in the background to ensure a smooth workflow. It’s especially helpful for blogs with frequent updates or multiple contributors.
- Implementing CI/CD for your blog can seem daunting at first, but it’s significantly easier than you might think. The core idea is to break down the publishing process into small, manageable steps that can be automated. This allows for efficient and reliable content delivery. For example, instead of manually uploading files, each commit to your version control system can trigger a chain reaction leading to the automatic build, test, and deployment of your blog.
Setting up a Jenkins Server :-
- Jenkins is an open-source automation server, making it a cost-effective and flexible solution for our purpose. The first step is setting up a Jenkins server. You can install it on a variety of platforms, from your local machine to cloud-based services like AWS or Google Cloud. The installation process varies depending on your chosen platform, but generally involves downloading the Jenkins WAR file and running it using Java. Detailed instructions can be found on the official Jenkins website. Consider using Docker for easy setup and management. It allows for easier scaling and management of your Jenkins server.
- After installation, you’ll need to configure Jenkins. This might involve installing necessary plugins, setting up security, and configuring your preferred methods of communication with other tools in your CI/CD pipeline. Remember to configure your Jenkins server according to your security practices. Security is a vital aspect of running a server and needs meticulous planning.
Creating a Jenkins Job for Blog Deployment :-
- Once your Jenkins server is up and running, it’s time to create a Jenkins job specifically for deploying your blog. This involves defining the steps involved in building, testing, and deploying your blog content. You’ll need to specify the source code repository (where your blog's files reside), the build commands, and the deployment instructions. This typically involves setting up a pipeline. A pipeline in Jenkins is a sequence of steps that are executed in order. Each step defines a specific task that needs to be performed. This gives you better control and more transparency during the process.
- Within the job configuration, you'll define the various stages of your deployment process. These stages might include tasks such as running linters to check for style issues, compiling any necessary code, executing tests, and finally, deploying the updated blog content to your web server. Each stage can have multiple steps to allow for more granular control over your workflow. You can define failure conditions, which will stop the pipeline if a problem occurs.
Integrating with Version Control Systems (e.g., Git) :-
- Version control systems like Git are essential for managing your blog's source code. Jenkins can seamlessly integrate with Git, automatically triggering a build and deployment process whenever you push changes to your repository. This integration ensures that your blog is always updated with the latest changes. This eliminates the need for manual intervention, making the process faster and more efficient.
- The integration involves configuring your Jenkins job to poll your Git repository for changes at regular intervals or to trigger a build whenever a change is pushed to the repository. You'll need to provide your Git repository URL and credentials for Jenkins to access your code. Consider using a secure method like SSH keys to avoid exposing your passwords. With appropriate configuration, your blog will always reflect the latest version of your content.
Automating Testing and Code Quality Checks :-
- Before deploying your blog, it’s crucial to automate testing and code quality checks. This ensures that your blog is free of bugs and meets your quality standards. Jenkins can integrate with various testing frameworks and code analysis tools. These tools can help you identify potential issues early in the development process, improving the overall reliability of your blog.
- You can incorporate various types of testing into your Jenkins pipeline, such as unit tests, integration tests, and end-to-end tests. These tests can help you ensure that your blog’s functionalities are working correctly and that any changes you’ve made haven’t introduced new bugs. Code quality tools such as linters and static analyzers can also be incorporated to ensure that your code is well-formatted and adheres to best practices. This improves the readability and maintainability of your code.
Deploying to Your Blog Hosting Platform :-
- The final stage of your CI/CD pipeline is deploying your updated blog content to your hosting platform. This process will vary depending on your hosting provider. Some providers offer seamless integration with Jenkins, while others might require you to use scripts or command-line tools. Common deployment methods include using SSH, FTP, or platform-specific APIs.
- The deployment process needs to be carefully configured to ensure that your blog is updated correctly and without downtime. This could involve using techniques like rolling deployments or blue-green deployments to minimize disruption to your readers. Consider using a tool that allows for easy rollback in case of issues. This gives you the option to revert to a previous version of your blog if necessary.
Monitoring and Logging :-
- Monitoring and logging are crucial for identifying and resolving any issues that might arise during the CI/CD process. Jenkins provides tools for monitoring your jobs and viewing logs. This allows you to quickly identify problems and take corrective action. Proper logging helps you understand what's happening throughout the pipeline.
- You can configure Jenkins to send notifications in case of failures. This ensures that you are promptly informed if there are any issues, allowing you to take corrective action as soon as possible. Tools like Slack or email can be integrated for this purpose. This allows for easier troubleshooting and faster resolution of any problems that may occur.
Advanced Techniques and Best Practices :-
- As your blog grows and becomes more complex, you might want to explore more advanced techniques. These could include using Docker containers for consistency across environments, implementing Infrastructure as Code (IaC) to manage your infrastructure, and adopting a more sophisticated approach to testing. Adopting IaC tools allows for version control of your infrastructure configuration and makes your infrastructure highly reproducible.
- Best practices include keeping your Jenkins jobs concise and modular, using clear and descriptive names, and implementing proper error handling. These practices improve maintainability and make it easier to debug problems. Regularly reviewing your CI/CD pipeline and adapting it to your evolving needs is also a crucial aspect of maintaining an efficient workflow. The goal is to keep your workflow agile and adaptable.
Troubleshooting Common Issues :-
- Troubleshooting is an integral part of using any CI/CD system. Common issues include build failures, deployment errors, and connectivity problems. Jenkins provides detailed logs to help diagnose these problems. These logs can help you identify the root cause of the issue and rectify it. These logs usually show details of the errors encountered and the context they occurred in.
- When encountering issues, start by checking the Jenkins logs for clues. If you're using Git, make sure your credentials are correctly configured and that you have the correct permissions. Check your deployment scripts for any errors, and ensure that your target environment is properly configured. If you are unable to resolve the issue on your own, consider searching for solutions online or seeking help from the Jenkins community.
Conclusion: Streamlining Your Workflow :-
- Automating your blog's CI/CD pipeline with Jenkins can significantly streamline your workflow, freeing up your time to focus on creating great content. By automating the build, testing, and deployment processes, you can reduce errors, improve consistency, and ensure faster publication times. Although the initial setup might require some effort, the long-term benefits are substantial. This will help increase productivity and help you manage your blog more effectively.
- Remember to start small, gradually adding more features and automation as your blog evolves. Don’t hesitate to explore the extensive Jenkins documentation and community resources for further assistance. With a well-configured CI/CD pipeline, you can create a robust and efficient blogging workflow that will improve your blogging experience.